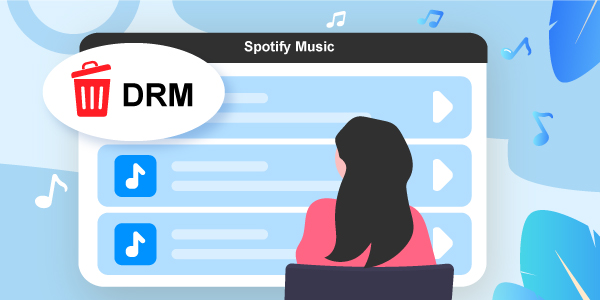
Like many streaming services, Spotify adds DRM (Digital Rights Management) protection to its audio files. This restricts you to playing music only within the official Spotify app or web player. To completely own your music and play it on any device, you need to remove DRM from Spotify.
In this comprehensive guide, we will walk you through the most effective methods and tools to safely bypass these restrictions and get your music freely—whether you are using a PC, Mac, Android, or iPhone.
- Part 1. Why Do We Need to Remove DRM from Spotify?
- Part 2. Does Spotify Premium Help Remove DRM from Spotify?
- Part 3. Is it Legal to Remove DRM from Spotify?
- Part 4. How to Remove DRM from Spotify – Best Tool
- Part 5. How to Remove DRM from Spotify Free
- Part 6. How to Remove DRM from Spotify Android/iPhone
- Conclusion
Part 1. Why Do We Need to Remove DRM from Spotify?
Spotify is highly restrictive about how and where you can stream its content. DRM protection technology exists to prevent piracy, but it also heavily limits paying users. Removing DRM unlocks true ownership of your downloaded music. Here is what you gain:
- Ad-Free Offline Listening: Enjoy your favorite tracks offline without needing a Premium account.
- Universal Playback: Play Spotify songs freely on MP3 players, car stereos, smartwatches, and DJ software.
- Permanent Backup: Keep your music forever. You won’t lose access to your downloaded library even if you cancel your subscription.
- Format Flexibility: Convert encrypted files into widely supported formats like MP3, FLAC, or WAV.
Part 2. Does Spotify Premium Help Remove DRM from Spotify?
Direct Answer: No. Spotify Premium does not remove DRM.
While a Premium subscription allows you to download music for offline listening and offers perks like ad-free playback and unlimited skips, the downloaded files are saved in an encrypted Ogg Vorbis format. These files cannot be recognized or played by standard media players or unauthorized devices.
If you cancel your Premium plan, your offline access is immediately revoked, and the downloaded cache becomes useless. To keep your music permanently, you still need a dedicated DRM removal tool.
Part 3. Is it Legal to Remove DRM from Spotify?
The legality of removing DRM from Spotify depends on your local copyright laws and how you use the files. Generally, removing DRM for personal, non-commercial use (such as format shifting to play on your own MP3 player) is tolerated and falls under “Fair Use” in many regions.
However, bypassing DRM violates Spotify’s Terms of Service. Furthermore, distributing, sharing, or selling these DRM-free files is strictly illegal.
Disclaimer: This guide is intended for personal and educational purposes only. Please respect the copyright of the creators.
Part 4. How to Remove DRM from Spotify – Best Tool
For the highest audio quality and best efficiency, using a dedicated desktop converter is the most reliable method. AudFun Spotify Music Converter is the industry-leading tool designed to cleanly strip DRM while preserving the original lossless audio.
Unlike standard recorders, AudFun quickly converts your Spotify tracks into common output formats like MP3, FLAC, and WAV at up to 5X speed. This means you can easily listen to Spotify offline without Premium on any device.

Main Features of AudFun Spotify Music Converter
- It supports playing Spotify on multi-devices and players offline
- The speed is good, going up to X5 rate and enabling batch conversion
- Save lossless ID3 tags and meta information
- It allows you to set output parameters like channel, bit rate, etc.
How to Download Songs from Spotify and Remove DRM by Using AudFun Spotify Music Converter
These steps will guide you on how to remove DRM from Spotify in simple ways for offline listening.
Step 1 Download and install AudFun
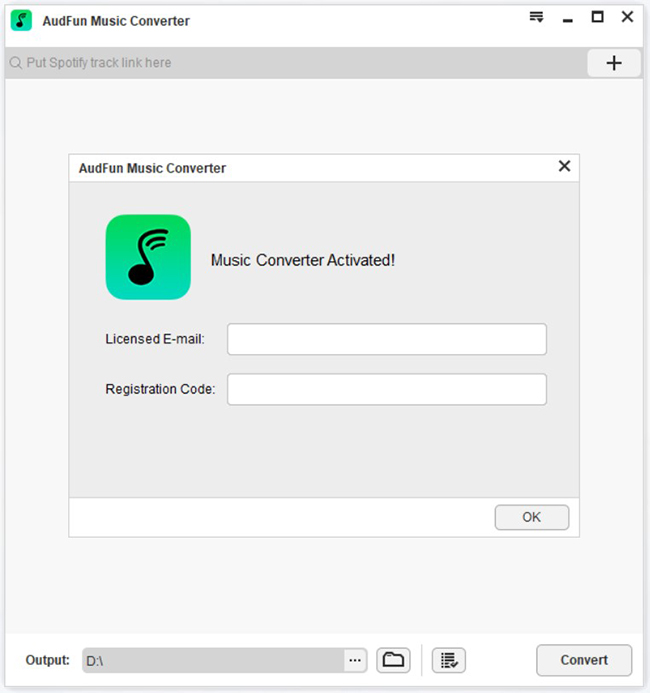
Check the AudFun Spotify Music Converter website and download the app. Then install & launch it from your computer. The Spotify app should also be installed on your computer before you start the conversion process.
You need to remember that the free trial will only convert the first 1-minute of your music. Simply remove this limitation by registering AudFun converter. So, click on the “Register” button and fill in your licensed email address and code to activate the AudFun app.
Step 2 Add Spotify playlists to AudFun
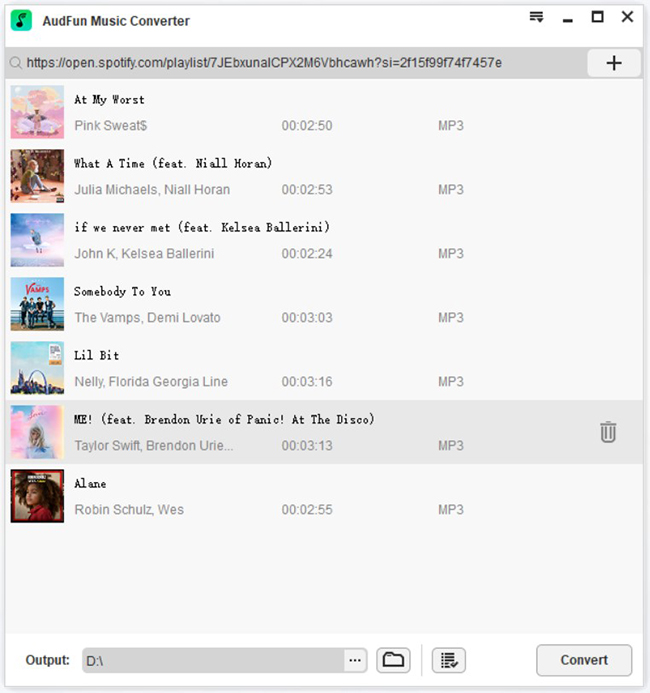
Check from the Spotify music library for the playlist that you wish to download and convert. Next, tap on the item and click the “Share” > “Copy Spotify Link” option to get the URL of the playlist. Then paste it to AudFun’s address bar and hit the “+” button to load the files. You can also get Spotify URI and convert Spotify URI to MP3 format. Or you can use the “Drag and Drop” feature to load the tracks if you just have a couple of songs to add.
Step 3 Customize output format for Spotify playlist
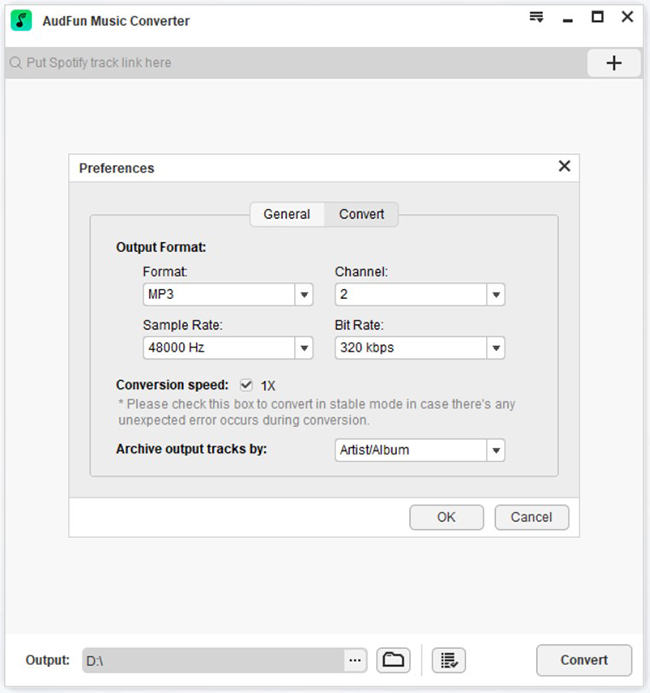
Choose the format you want. Go to the “Menu” tab and hit on the “Preferences” > “Convert” option. Wait for the Settings window to open and start to adjust the output format and parameters.
Step 4 Remove DRM from Spotify and convert Spotify music
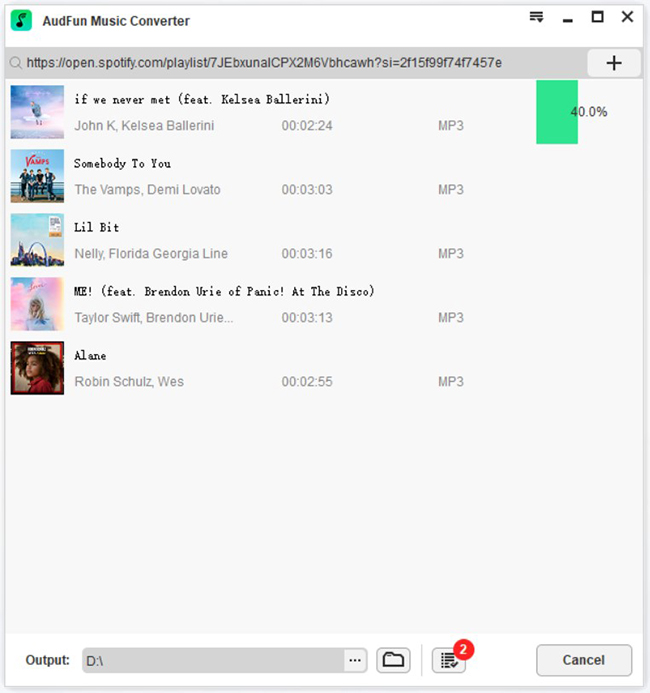
Finally, confirm your entries and click on the “OK” button to proceed. Then hit on the “Convert” tab once more to allow the AudFun app to download Spotify playlists to MP3 or other formats that you set. When done, check in the “Converted” Spotify folder on your computer to get DRM-free Spotify playlists for offline playback.
Part 5. How to Remove DRM from Spotify Free
If you don’t want to spend a dime, you can bypass DRM using free audio recording software like Audacity. Because it records the audio directly from your soundcard instead of downloading the encrypted file, it essentially creates a DRM-free copy.
- Pros: 100% free.
- Cons: It records in real-time (a 3-minute song takes 3 minutes to record) and may result in slight audio quality loss.
Step 1. Download and install “Audacity” from its official website.
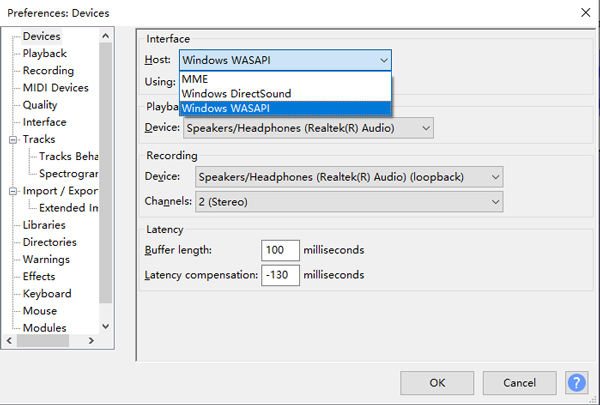
Step 2. Launch the app, click the “Edit” tab, and select “Preferences”.
Step 3. Go to the “Devices” section. Under “Interface”, set the Host to “Windows WASAPI”.
Step 4. Click “OK”. Press the “Record” button in Audacity and start playing your Spotify song. It will record the audio automatically.
Step 5. Once finished, go to “File” > “Export” > “Export as MP3”. You now have a DRM-free track.
Part 6. How to Remove DRM from Spotify Android/iPhone
While desktop software is the safest and most efficient route, it is possible to remove DRM directly on your mobile device.
Editor’s Note: Use third-party mobile apps and Telegram bots with caution. They are not officially supported and can occasionally pose a risk to your account security.
Remove DRM from Spotify on Android
For Android users, an app called Fildo is a popular workaround for getting DRM-free music.
Step 1. Download the Fildo APK and install it on your Android device.
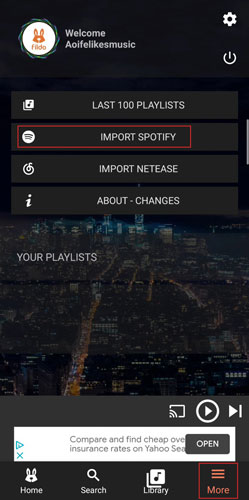
Step 2. Navigate to the “More” tab, click “Import Spotify”, and log into your Spotify account.
Step 3. Once your library imports, tap the “Dot” icon next to any track to download it as a standard MP3 file to your phone storage.
Remove DRM from Spotify on iPhone
iPhone users can leverage Telegram bots to fetch DRM-free audio tracks without needing to jailbreak their devices.
Step 1. Download the “Telegram” app from the App Store.
Step 2. Open the Spotify app and copy the link to the playlist or song you want.
Step 3. In Telegram, search for a “Spotify Music Downloader” bot and tap “Start”.
Step 4. Paste the Spotify URL into the chat and hit “Send”.
Step 5. The bot will reply with a downloadable MP3 file, allowing you to save it offline to your device.

Conclusion
Removing DRM from Spotify is the ultimate way to enjoy your music on any device without restrictions. While free methods like Audacity work, they are time-consuming and lack lossless audio quality. Mobile workarounds like Fildo and Telegram can be convenient, but they carry potential security risks.
For the safest, fastest, and most high-fidelity experience, AudFun Spotify Music Converter remains the most reliable solution for both PC and Mac users. Try it now!